
How To Make Ice Cream Cone Out Of Paper?
Creating an ice cream cone out of paper or crafting fake ice cream cones is a delightful, creative and engaging activity, perfect for children and adults alike. These whimsical craft projects not only invoke imagination but also enhance fine motor skills.
Whether you’re planning a party, crafting with kids or simply exploring your creative side, learning how to make an ice cream cone out of paper or crafting fake ice cream cones can be a delightful and imaginative endeavor.
In this guide, we’ll walk you through the steps to make your very own paper ice cream cones or fake ice cream cones, providing you with a delightful and versatile craft that’s sure to bring joy to both young and old alike. So, let’s dive into the world of papercraft and creativity as we explore the art of making these delightful faux desserts.
Make Ice Cream Cone Out of Paper
List of necessary items for crafting a paper ice cream cones
- Construction paper or colored cardstock: These are going to be the primary materials for your ice cream and cone.
- Scissors: Used to cut out the shapes needed to create your ice cream and cone.
- Glue or glue stick: Needed to secure your paper pieces together.
- Ruler: Helps in measuring and cutting your paper pieces accurately.
- Circular templates: You can use circular objects, such as a glass or lid, to trace circles for the cone base.
- Pencil: Used for sketching out your cone and ice cream shapes before cutting.
- Cotton balls or tissue paper: These can be used to give your ice cream a “fluffy” appearance.
- Glitter, sequins or colored markers (optional): These can be used for adding additional decorative details to your ice cream.
Steps for making a paper ice cream cone
Here is a simple step-by-step guide on how to make an ice cream cone out of paper or crafting fake ice cream cones:
- Choose your paper: Select the colored construction paper or cardstock you want to use for your cone and ice cream. You can choose any color you like but traditional ice cream cones are often made with white, pink and brown paper.
- Cut out a triangle from the paper: Using scissors, cut out a triangle shape from your chosen colored paper. This will be the base of your cone. You can use a ruler to ensure that your triangle has equal sides and angles for a more symmetrical look.
- Make a circle template: Use a circular object, such as a glass or lid and trace around it on another piece of paper to create a circle template. Cut out the circle with scissors.
- Cut the circle in half: Cut the circle you just made in half. This will be used to create the top of your ice cream scoop.
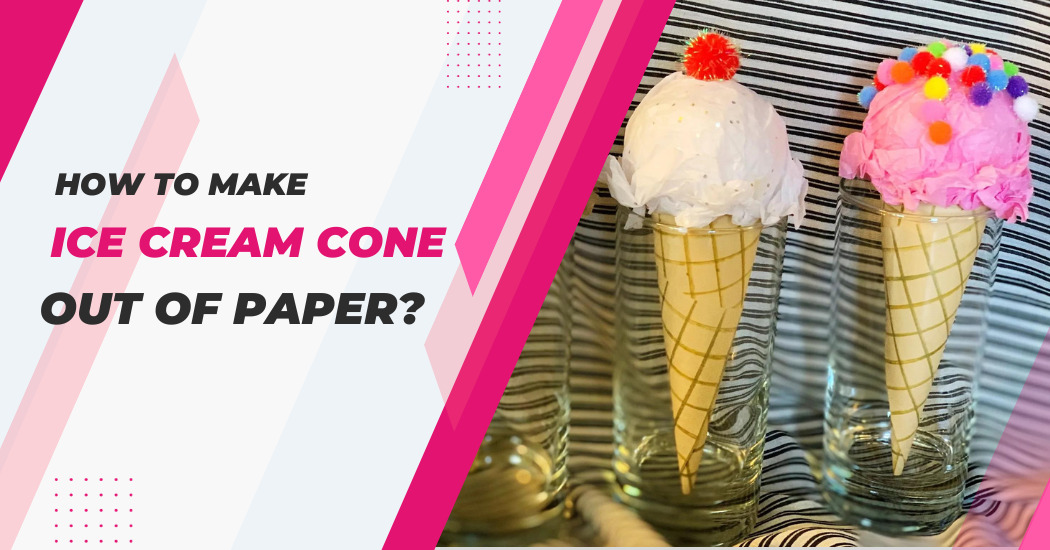
- Create a cone shape: Take your triangle base and slowly roll it into a cone shape, with one pointed end at the bottom. Use glue or tape to secure the edges together.
- Glue the half-circle on top: Take the half-circle and glue it onto the pointed end of your cone, creating the appearance of a scoop of ice cream.
- Use cotton balls or tissue paper to give texture: To make your ice cream look more realistic, you can use small pieces of cotton balls or crumpled tissue paper and glue them onto the half-circle to create a “fluffy” texture.
- Add additional decorative details: You can use glitter, sequins or colored markers to add sprinkles, sauce drizzles or any other fun and creative decorations to your paper ice cream cone.
- Let it dry: Once you have finished decorating your paper ice cream cone, let it dry completely before handling it or displaying it.
Tips for making perfect paper ice cream cone
- Use high-quality paper: For longer-lasting fake ice cream cones, opt for thicker, high-quality cardstock or construction paper. It’s sturdier and less prone to tearing or getting damaged.
- Be patient with drying time: Give your project enough time to dry properly, especially after applying glue. Handling it too soon may cause pieces to shift or fall off.
- Add extra glue or tape: When assembling your cone, add some extra glue or tape along the seams for additional stability. This will make the cone more durable and prevent it from unraveling.
- Get creative: Get creative with the decorations! You can use googly eyes, pipe cleaners or even draw funny faces on your ice
- Crumple paper for texture: If you’re using tissue paper to create texture, crumple it up before gluing it to the cone. This will give your ice cream a more realistic, fluffy appearance.
- Store properly: Store your paper ice cream cones in a cool, dry place where they won’t be exposed to sunlight for long periods. This will help prevent colors from fading and the paper from getting brittle.
- Use a protective layer: To make your paper ice cream cones last, even longer, consider applying a protective layer of clear craft sealant or spray lacquer after you’ve finished decorating and everything has dried. This will create a barrier against moisture and wear, preserving your creation’s vibrant colors and detail.
Creative ways to use the paper ice cream cone
Crafted paper ice cream cones aren’t just for decoration, they can be used in numerous fun and creative ways:
- Themed parties: These cones can add a unique touch to any ice cream-themed party or event. You can hang them as garlands, use them as table centerpieces or even incorporate them into invitations or thank you cards.
- Classroom activities: For teachers, these cones can be a great activity for young students. Kids will love making their ice cream cones and it can also be a fun way to teach them about shapes, colors and textures.
- Gift tags or cards: Smaller versions of these cones can be used as gift tags or cards, adding a personal, handmade touch to any present.
- Ice cream party favors: You can fill these cones with small treats or trinkets and give them out as party favors. Everyone will love taking home their own little ice cream cone!
- Photo props: These cones can also be used as a prop for a fun and whimsical photo shoot.
- Dramatic play: Kids can use these in their play kitchens or stores, adding a fun element to their imaginative play.
Remember, the possibilities are only limited by your imagination. So, get creative and see how many ways you can use these adorable crafted ice cream cones!
Common mistakes to avoid when making paper ice cream cone
- Choosing the Wrong Paper Material: The choice of paper is crucial for the structural integrity of your paper ice cream cone. Avoid using thin or flimsy paper, which can easily tear or collapse.
- Neglecting the Cone’s Shape: An ice cream cone has a very distinctive cone shape. It’s crucial not to make your cone too fat or too narrow; it needs to mimic the shape of a real ice cream cone.
- Forgetting to Secure the Cone Properly: It’s a common mistake to not secure the cone adequately. Be sure to use enough adhesive to prevent the cone from unraveling.
- Not Smoothing Out the Edges: Paper can be sharp, so forgetting to smooth out the edges can lead to uncomfortable handling. Always ensure the edges of your paper cone are smooth and safe to hold.
- Lack of Creativity: A paper ice cream cone is also an art project. Don’t forget to decorate your cone; a lack of creativity can leave your cone looking bland and uninteresting.
FAQ’s -Make Ice Cream Paper Cone
Can I use real ice cream on the paper cone?
No, these paper cones are not meant to hold real food items. They are created for decorative or play purposes only. Using real ice cream could damage the paper and make it difficult to store or display. So, it’s best to stick with fake ice cream or other small treats if you use them as party favors. Remember, always use your imagination when crafting!
How long will my paper ice cream cone last?
The lifespan of your paper ice cream cone will depend on how it’s stored and handled. If properly taken care of, it can last for several months to a year. Using high-quality materials and adding a protective layer can also help prolong its lifespan.
Avoid exposing it to direct sunlight or moisture, as these elements can cause the colors to fade and the paper to become brittle.
Are there any templates available for making paper ice cream cones?
Yes, there are plenty of templates and tutorials available online for making paper ice cream cones. You can even create your unique design by using different types of paper, decorations and techniques. Let your creativity run wild! Just remember to have fun with it and don’t be afraid to experiment.
Final Words
In conclusion, creating an ice cream cone out of paper is a fun and creative DIY project that allows you to enjoy the visual appeal of an ice cream treat without the mess. By following the simple steps outlined in this guide, you can craft a paper ice cream cone that can be a delightful addition to various art projects, party decorations or even a playful accessory for imaginative play.
This activity is not only enjoyable for children but can also serve as a charming and inexpensive decorative item for special occasions. With a bit of patience and a touch of creativity, you can craft your very own paper ice cream cone, adding a whimsical touch to any event or setting. So, gather your materials and enjoy the process of making a delicious-looking, calorie-free paper ice cream cone.